Tutorials • Webuzo
Adding an FTP account in the Webuzo administration panel
This tutorial explains the steps necessary to add a new FTP account in the Webuzo admin panel.
Views 762Updated 1 anPublished on 26/06/2017by Florin P.
Introduction
This tutorial explains the steps necessary to add a new FTP account in the Webuzo administration panel.
Requirements
- Webuzo account management details
Steps
- After logging in to the Webuzo panel, we will go to the FTP section.

- By clicking on Add FTP Account, a new page will open where we can add a new FTP account.
- Here we will add in the fields below: the FTP username, in our case the user is hostico, the desired password that will need to be entered in both fields, the allocated space for the user or the existing available space (Quota - unlimited) or we specify the desired space (the size in MB for the desired space) and in the last field Directory the directory to which the FTP account user will have access.
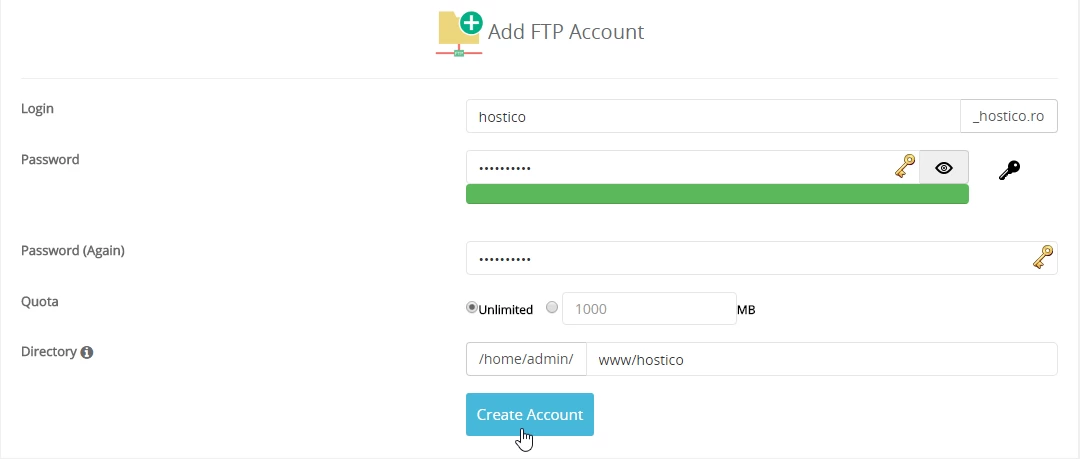
- We recommend using a password of at least 10 characters that contains both uppercase ABC and lowercase abc letters, numbers 0123456, and special characters (*, ?, +, #). After entering the password, the bar below it will change color based on how secure the chosen password is. The red color represents a low-security password, orange indicates medium security, and green indicates a high-security password.
- We also have the ability to automatically generate a password by clicking the button
 , and clicking the symbol
  to view the password.
 - The completion of this operation will be done by clicking the Create Account button
- To modify an existing FTP account, we will access Manage FTP, and here we can change the FTP account password by clicking on the symbol
 . edit the allocated space (quota) by clicking on the button
  .
.